

Warming up is always a challenge in day-to-day riding. It’s easy to let it go on for an extremely long time, but then it’s hard to know what to do if you have only 10 minutes to warm up for whatever reason. So what does it take to make for an effective warm-up?
What Should a Warm-Up Accomplish?
Knowing the goals of the warm-up helps to understand what to do. The goal of the warm-up is to literally warm up the muscles and synovial fluid in the joints before putting them to work. If they’re cold, there’s a greater risk of injury, just as a rubber band is more likely to snap if it’s frozen than if it is warm. However, it’s meant to warm up before the actual work begins. So, this means that the warm-up needs to be fairly concise and effective for a short period of time. It also needs to warm the joint up through the majority of its natural range of motion. This doesn’t mean the horse has to work to the extreme range of motion (this is actually not healthy anyway), but it does need to work the joints through the full range of motion that it’s going to work in.
An old recommendation is to walk a horse on a loose rein for 20 minutes before beginning work. While this is never a bad idea, sometimes it is not always practical. Sometimes, a horse comes out of the stable buzzed and distracted, and getting a horse to walk when they’re in that state can be a challenge in itself. Some horses need a little more than just walking; I find some more advanced horses need mild lateral work to warm up their full range of motion. Sometimes, we simply don’t have 20 minutes to walk on a loose rein. This is a good warm up to use periodically or even regularly, but it’s always a good idea to have various warm-up routines so that if time is limited, you have options you’ve worked with and are familiar with when the time arises.
What Should a Warm-Up Look Like?
First, a warm-up should be intentional. One of the rules of the Spanish Riding School is not to warm up meandering aimlessly, but to warm-up on purposeful lines. This has a few purposes: 1) if you’re sharing an arena at a boarding barn or riding school, having intentional lines makes it easier to work around other riders or for other riders to work around you; 2) you can use the geometric patterns (gymnastics) to work the horse for you; 3) it maximizes everything you do in your riding, fulfilling the job of “riding every stride” (see previous blog post). If you’re sloppy in the warm-up, you have to work that much harder to get the horse balanced in the working portion of the ride.
I prefer to pick a pattern or two for each gait that help the horse stretch laterally, such as serpentines (or shallow serpentines). For the more advanced horses, I throw in a little shoulder-in or haunches-in, often alternating with a free walk or stretchy trot/canter. These kinds of transitions between curved and straight lines are very powerful for suppling the horse and warming it up. Transitions between gaits also are excellent to use in a warm-up, but I usually save those for the end of the warm-up, depending on the horse. For the trot, alternating posting diagonals on regular intervals can help to alternate which hind leg is doing the most work and can therefore help gently warm up the horse. Adding short periods of sitting the trot (such as for three steps, or three “bounces,” at a time) can help to loosen the back of a horse that’s starting to work more with sitting trot.
Keeping the gaits relatively forward helps to use the full range of motion of the joints, but take care not to overdo with lengthened or extended gaits or to confuse rushing with forward. Ideally, we want the horse going in a nice, self-sustaining working gait, tracking up but not overtracking. Overtracking too early can put too much strain on the ligaments and tendons when they are cold, leading them to be more easily injured.
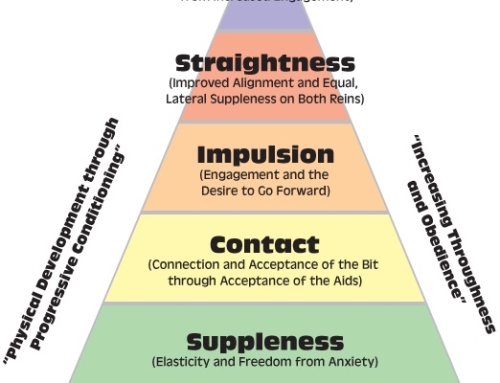
As far as whether the horse should be made to go “on the bit,” this becomes a bit of a classical soapbox. Ideally, “on the bit” should be the result of the horse being supple and having a consistent connection with the rider. So, classically, the warm-up should be in “natural carriage,” though the warm-up may help to address tension in the neck and the back that will result in the horse looking more “on the bit.” This means to keep a consistent soft contact (however much the horse prefers) but otherwise to let the horse place its head where it wants. If the horse tends to curl under, it’s better to keep the head more elevated, as this will help the horse balance more effectively. I like to give occasional long and low “stretchy” breaks, but I have found it more effective to warm up and even school the green horses in natural carriage (same height as “on the bit” but with the nose well ahead of the vertical), and this was the method promoted for a long time in the past by the Old Masters.
So, a warm-up should look forward but not rushed with the head in natural carriage with long and low breaks, using a few simple, established patterns precisely and making sure to help the horse warm up through all its natural range of motion for the level it is at laterally as well as longitudinally. I tend to cycle through different patterns; sometimes I’ll use the same pattern for a few rides, but sometimes I’ll use a different one for each day of the week, depending on my schooling goals for that day. Each horse may have a different warm up that is more effective for their particular conformation; one of our chonky stallions does better with more lateral work in his warm up, but one of the “noodly” warmbloods at a similar level does better keeping it simpler.
Application
So, next time you warm up, try working on “riding every stride” and using a few simple patterns. Maintain consistent contact (without pressuring the horse into one head carriage or another), a consistently forward (but not rushing) tempo, and precise geometry. Make sure to gently work the horse through its range of motion laterally as well as through forward movement, especially with transitions between straight lines and curves (or even directions). By taking these few steps, you’ll find that you get more done in a shorter time in your warm-up, and your horse will be fresher and more supple and more ready for the work at hand.
Discover more from Tempus Renatus School of Classical Horsemanship
Subscribe to get the latest posts sent to your email.